How Many Product Images Do I Need?
So how many images do I need for each product?
It’s a question that comes up almost every time I work with a new e-commerce client: How many images do I need for each product?
There isn’t always a definitive answer to this. There are a few considerations to take into account when determining the right number of product photos to post on your shop product detail page (aka PDP).
What does the product tell you?
First and foremost, what do you want your customer to know about the product? If you are an internet only retailer, your online store is the only place where you customer can get information about your products, so what do you think they should know about it?
In general, a good place to start is 3 images: Front of the product, back of the product, and a detail shot. This is pretty typical for things like apparel, whether shot on a model or off-figure, and works well for most products in other categories.
Maybe your product is a purse or backpack, in which case you will still probably want a front, back, and detail shot, but maybe you want to add an interior shot so your customer can understand what the inside of the bag looks like.
Put yourself in the shoes of your customer, and try to imagine what you would want to see in order to make a decision to buy.
What does your Product Detail Page look like?
This is one thing that is often overlooked, but how are your product detail pages laid out? Does it look better with 4 images instead of 3? Are there parts of the page other than the main images where you can include additional detail images? Think about an Amazon listing, some listing pages have the standard image navigation, but as you scroll down the page, there are often additional detail images throughout the product information. Depending on how your PDP looks, it may look incomplete if you have too few product images, or overcrowded if you have too many.
Another thing to consider here: Does you PDP have flexibility in image count? If you sell not only apparel, but jewelry, sunglasses, handbags and other accessories, a standard image count may not work for all of those product categories. Some websites and platforms are structured in a way that allows flexibility in the number of product images you show, without sacrificing consistency.
Consider Mobile Users
Similar to the last section, you should consider how your product detail page looks on a mobile device. Product photos on your desktop site may be display in a carousel format that users can click through, but on mobile they may appear in a block of images that you must scroll through before any call to action (such as a Buy Now) button is visible. If they must scroll through 15 product images, that may discourage potential customers from buying if they don’t clearly see a way to purchase.
Are there platform requirements?
Maybe you have your own custom built e-Commerce site, or your using Shopify, Etsy, or selling on Amazon. Each of those may have their own requirements for product photography, not only number of images, but color space, resolution, and file size. This is also true if you are a brand supplying imagery to a retailer, check with the retailer if they have a required number of product images in order to sell on their site or platform.
Here are some resources for platform image requirements:
Amazon Product Image Requirements - Amazon
Additional Amazon Product Imagery Ideas - Business 2 Community
Shopify Image Requirements - Shopify
Who is your target demo?
Sometimes it’s worth checking out any information you can on regional differences in product photography expectations. Some regions may want as many as 15 photos of a single product, whereas other areas may only look through the first 3 or 4. As online purchasing grows and our e-Commerce businesses become more and more global, you may need to seek out information on what different global markets expect when it comes to product photos.
What are others in your space doing?
While I don’t always recommend comparing yourself to others when talking about content, creative, or product photography, is certainly can be useful to identify trends in product photography in your space, especially when trying to determine something practical like number of images to show.
Consider A/B testing
Most sites and retail platforms have a built in way to A/B test. For larger brands you can expand this to email campaigns, PPC campaigns, etc. I am not an expert in A/B testing, but in its simplest form, you have one version of the PDP with 3 product photos, and one version of the PDP with 8 product photos. Using a tool like Google Analytics, you can track conversions unique to each PDP, and use that to determine if the cost to product more product images is worth the return in conversion.
Here are some additional resources on A/B testing:
What is A/B testing - Big Commerce
The Complete Guide to A/B Testing - Shopify
Amazon A/B Testing Tips - PPC Entourage
Do you need more help with your product photography or strategy?
I am always adding articles that I hope will help you understand how to think about and implement product photography for your eCommerce business. You can read them here:
If you are interested in my services as a product photographer or consultant, contact me here:
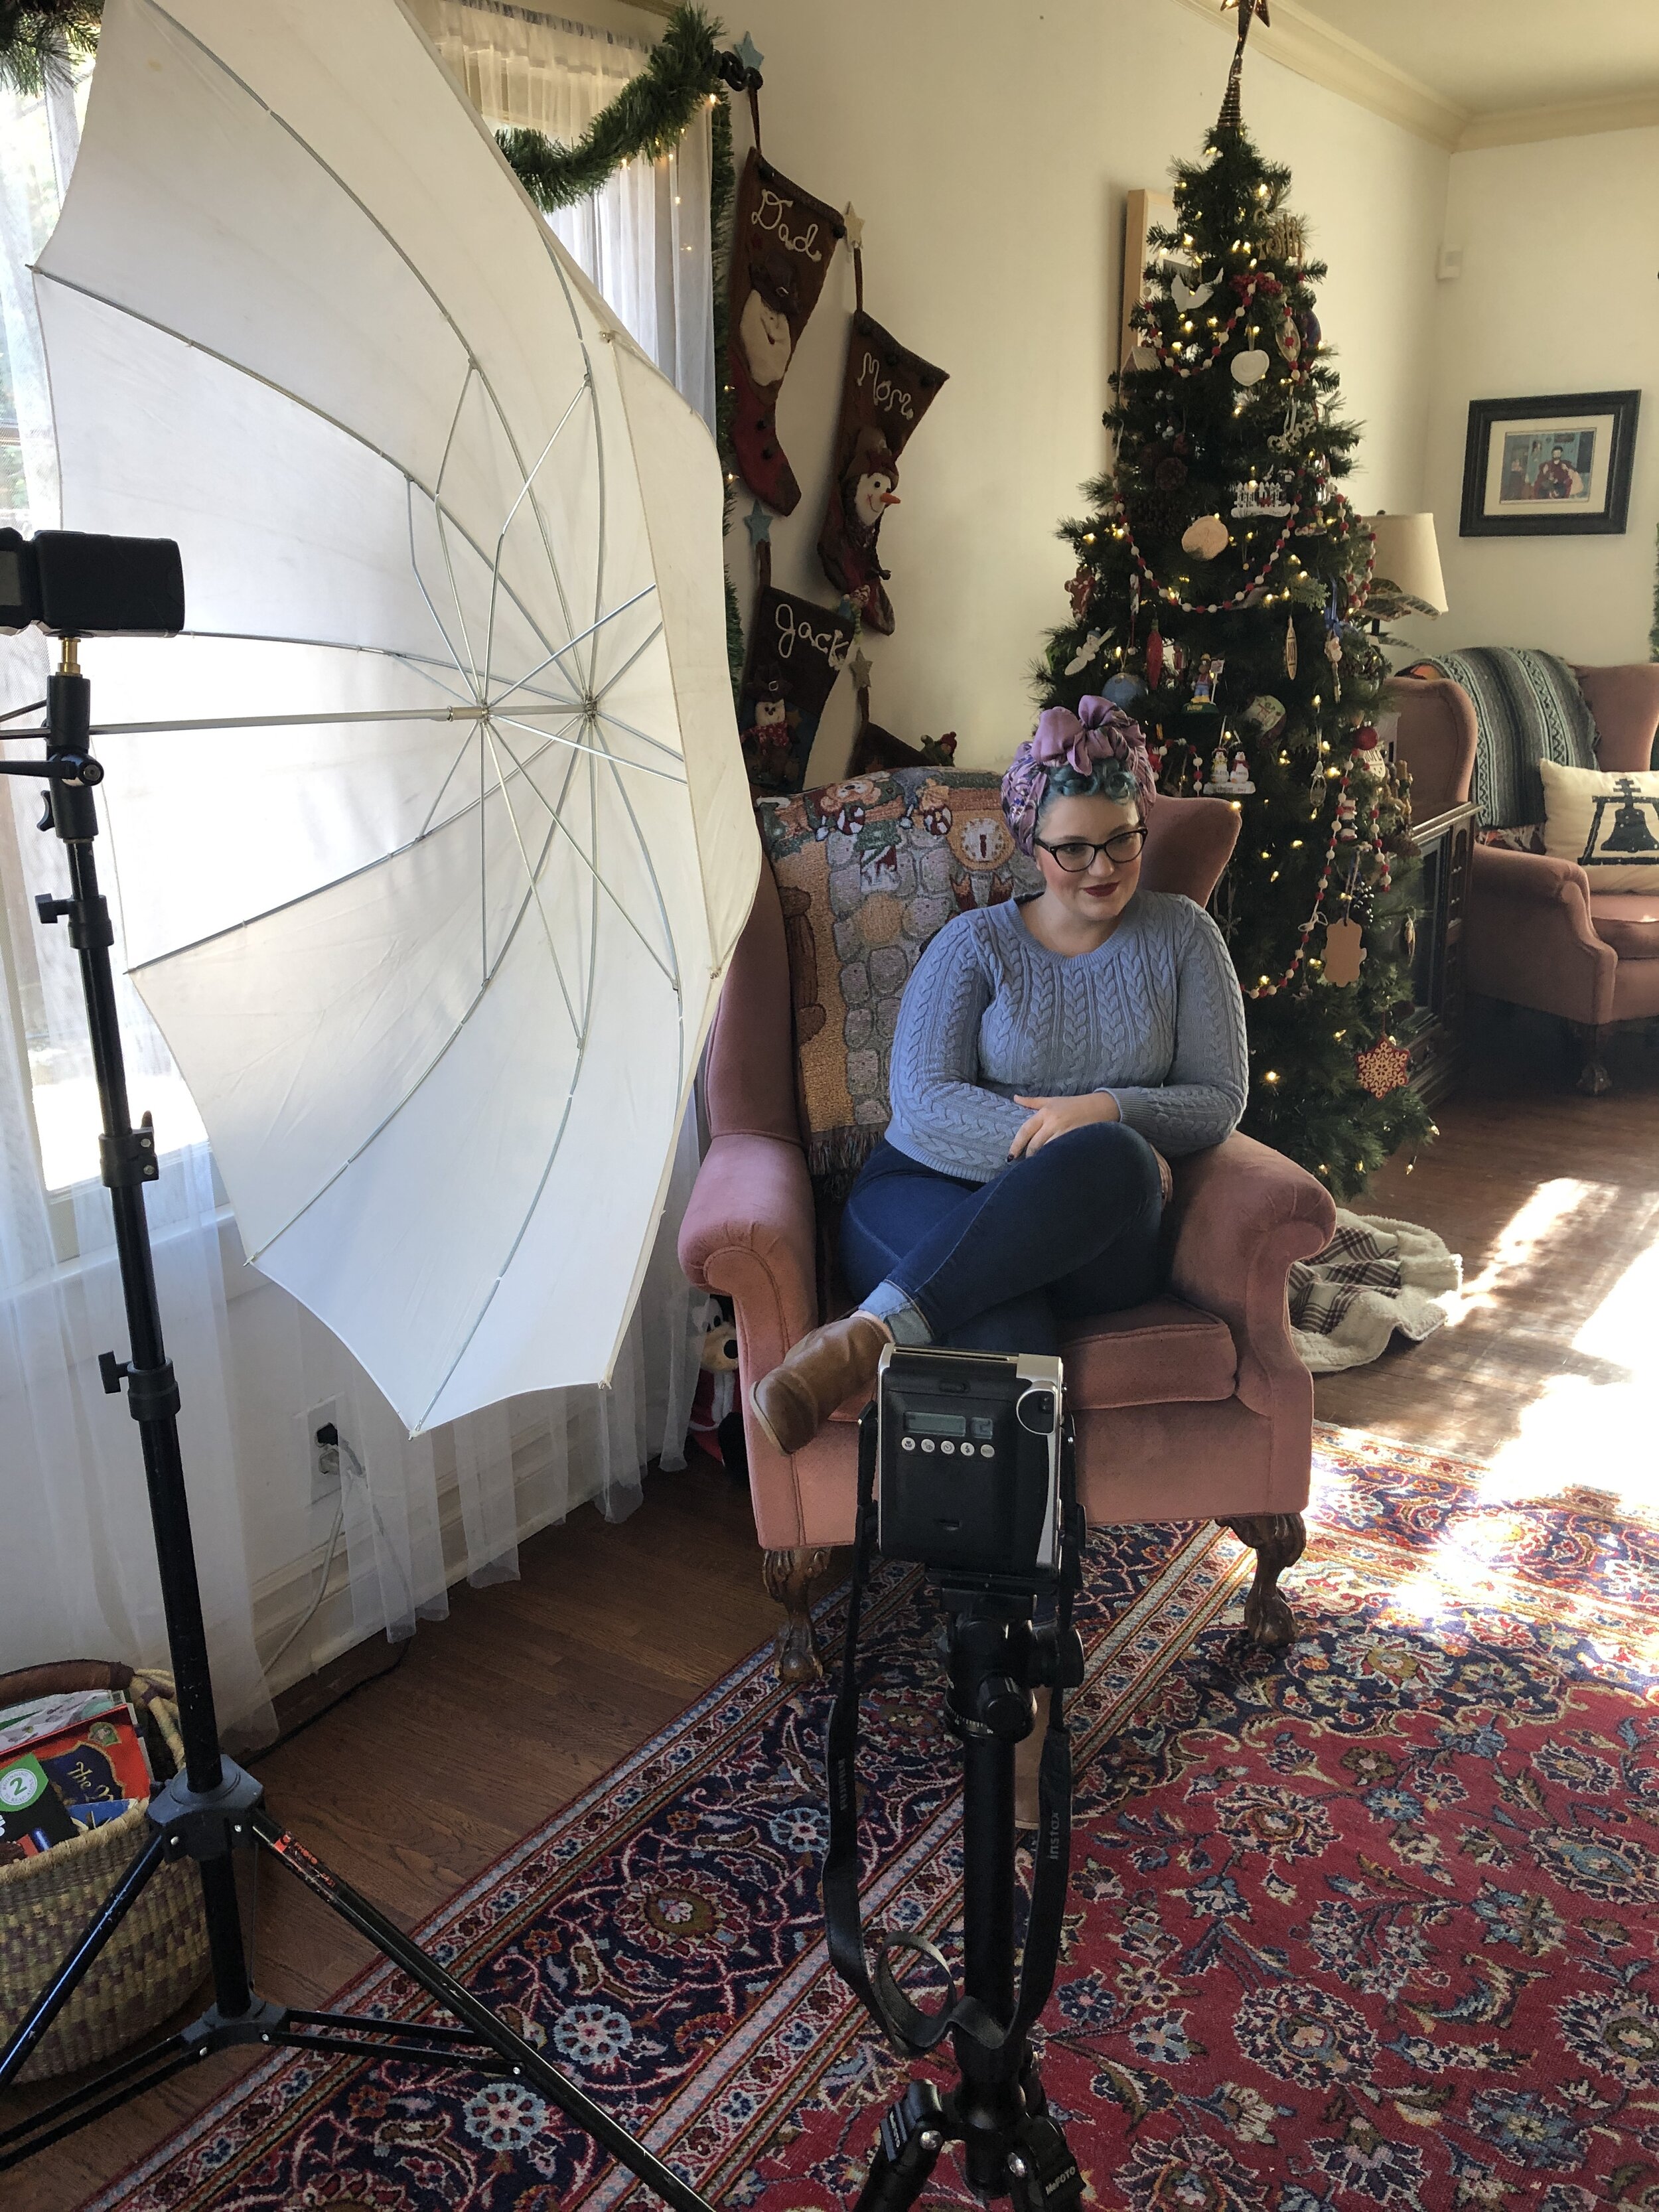
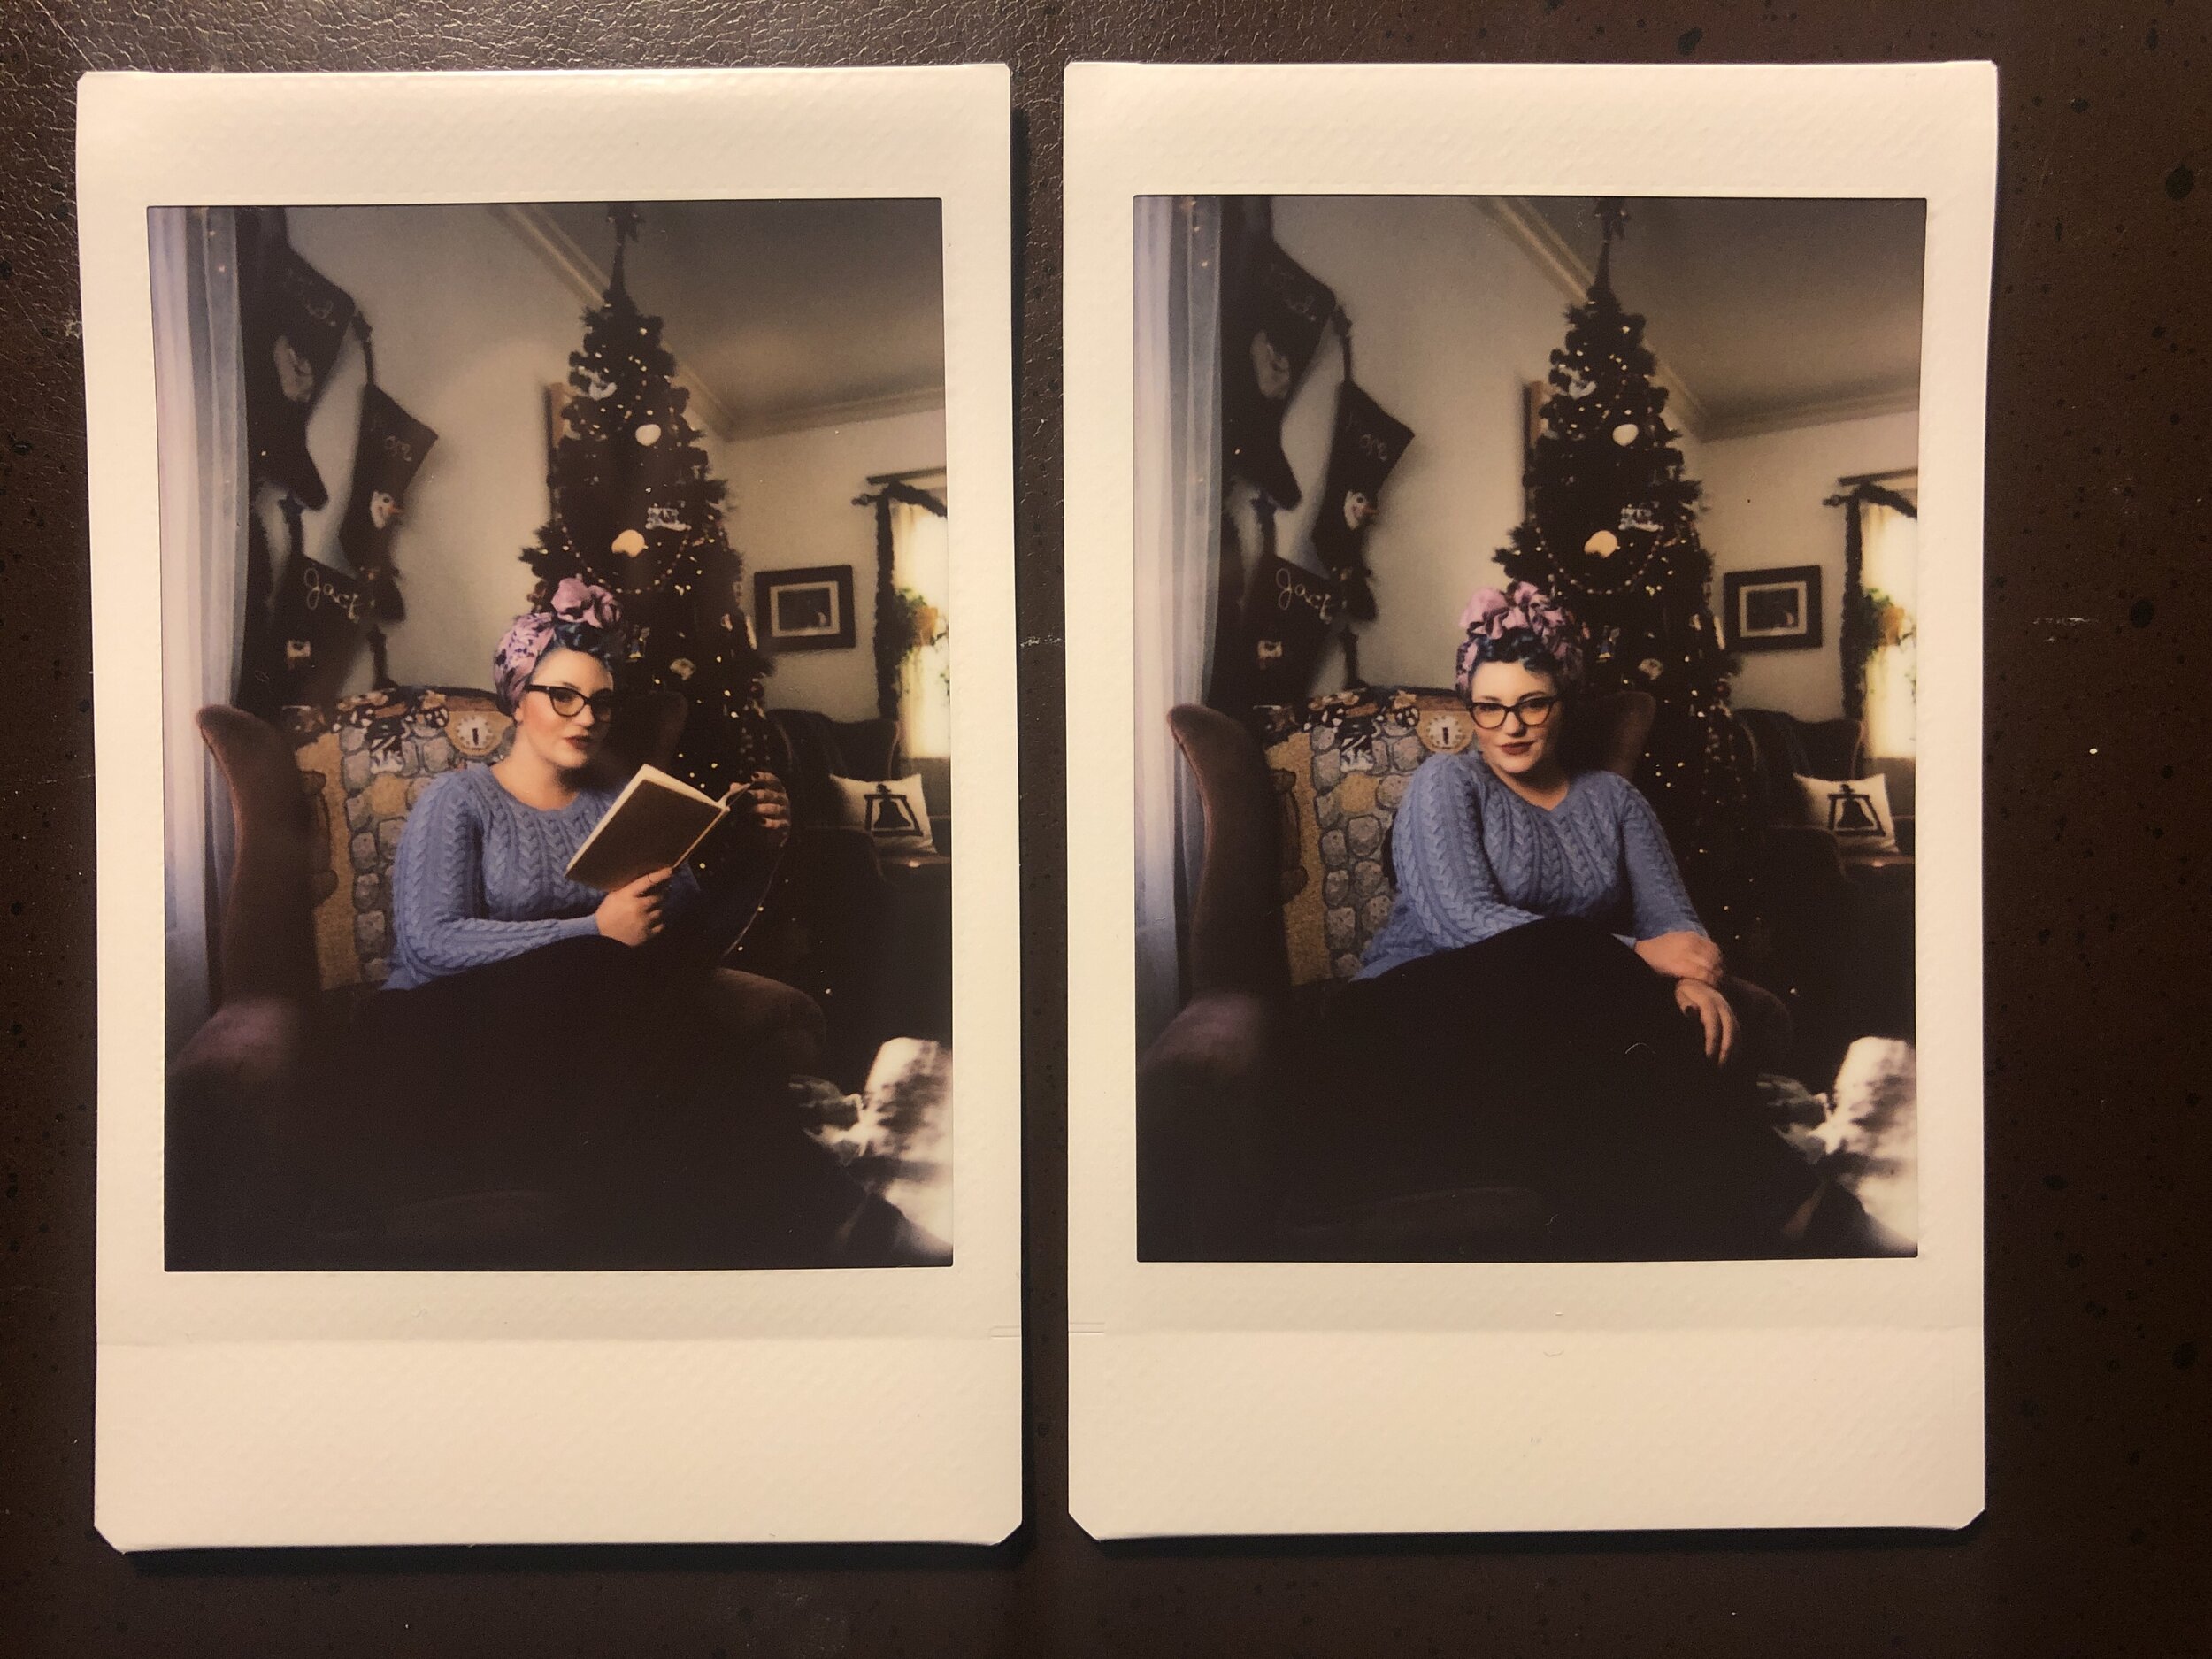
Instax Strobe Kit Giveaway

CONTEST CLOSED! Thanks for your interest!
Instax Strobe Portrait Kit Giveaway!
To kick off 2020, I’m giving away a complete Instax Strobe Kit!
In 2019 one of the most popular pages on my website was the tutorial for using Off Camera Flash with an Instax instant camera, link right here:
Instax + LP180: Using off camera flash for your instant prints
You will get everything you need to create your own custom light for your instant portraits:
Instax Mini90 Camera + Pack of Instant Film
LumoPro LP180 Strobist Kit - Manual Flash Unit, Light Stand, Umbrella, Sync Cables, Carrying Case
Sekonic L-308x Flash Meter
How To Enter
To enter this giveaway is simple:
Enter your email and Instagram handle below (This is very important, some prize items are shipping directly from the partner, we need to be able to coordinate delivery)
Make sure you follow @danieltjester on instagram
Like the giveaway post: Click Here
Comment and tag TWO friends that you think would be interested in winning
A quick note:
We respect your privacy. Please note, by entering this giveaway, you agree to receive emails from me and from prize contributors like Sekonic (You can read their privacy policies by clicking the link)
Contest will close on Sunday January 12. Winner will be randomly selected from Instagram comments, notified via email, and announced on Instagram the week of Jan 13. Must be 18 or older and prize pack must be shipped to a US address to win.
Father's Day Gift Guide
Father's Day is one week away and most likely you haven't been able to think of the right gift for the dad in your life. I decided to try to help a little. I put together this gift guide that should make shopping for dad a breeze, provided that your father is a 31 year old photographer and father of three, who likes coffee, cycling, and durable pocket notebooks.
1. A New Field Notes Subscription

Durable Pocket Notebooks, Made in the USA.
If your dad is anything like some dads I know, his current Field Notes subscription just ran out with the Summer 2016 edition. Do him a favor and re-up with another year of pocket notebook bliss.
2. A Set of Rock & Road 43mm x 700c tires

Make sure they're gum walls.
Like most fathers, the tires on your dad's 2015 Specialized Awol that he got for his 30th birthday last year are looking a little worn. Spruce up his ride with a set of Rock & Roads, the tires he's had his eyes on since the day he bought the bike.
3. Augies Coffee Subscription

Augies. Mmmmmmmm.
Listen, there's pretty good coffee in Louisville...I mean, wherever your dad lives, but treat him to MistoBox's Golden Mug award winner for Best Roaster with this coffee subscription. Augies will send you their best stuff, and man is it good stuff.
4. These Incredible New Nintendo Vans

Man these are cool.
Your dad loved The Legend of Zelda growing up. Your dad bought a Super Nintendo with his first paycheck so he could finally beat A Link to the Past after your grandmother sold his childhood console at a yard sale one summer and he never got to finish the game. Your dad also needs new shoes.
5. Swift Industries Gear

Bike Camping!
Ever since you learned to ride your bikes, your dad has wanted to take you bike camping. Show him you're ready by outfitting him with this Swift Industries campout swag.
There you have it, you're ready to own father's day with this gift guide virtually guaranteed to make me happy. I mean your dad. Happy Father's Day.
Whitening Teeth in Capture One
As of version 8 of Capture One, users have been blessed with the ability to control white balance on an adjustment layer. This is useful for a number of reasons, but the biggest win for my workflow is a very simple, and very repeatable way to whiten and brighten teeth in Capture One.
For a change of pace, I recorded a video to demonstrate this technique. Steps are detailed out below.
Step One: Make you desired adjustments to the overall image
Step Two: In the Local Adjustment tool tab, create a new adjustment layer and call it "Teeth"
Step Three: Use the paint brush tool to paint a mask over your subjects teeth
Step Four: Use the local White Balance adjustment tool to reduce the Kelvin temperature of the masked area until you achieve the desired effect. You can also locally adjust exposure and/or brightness to further enhance the teeth.
I find this to be a really effective, easy, and easily repeatable way to enhance tooth that appear too yellow, while keeping your images in Capture One. I used to rely on Photoshop to do any teeth whitening I needed, which meant I made my adjustments in Capture One, then exported to Photoshop for further editing. Now I can keep 99% of my workflow in Capture One, reserving Photoshop for only major editing.
Fake The Setting Sun with Off Camera Flash
My wonderful and beautiful wife Alesia from our maternity shoot for our third child Rockford. The sun had gone down behind some low clouds and foothills when we saw this patch of flowers. To recapture that sunset feel, I faked the setting sun with my LumoPro LP180 and a CTO gel.
I really like having light sources in frame. Or at the very least, shooting light towards my lens. When I’m shooting outside, I pretty much always try to shoot INTO the sun.
I know, it’s a little outside of some peoples understanding of the "rules" of photography.
I’ve tutored new photographers who think I’m crazy when I set up a portrait shooting into the sun. I just love it.
However, on more than one occasion I’ve been shooting away and the sun dips below the horizon. Or it was obscured by some low cloud cover. Or it was 1pm in July. Sometimes the sun isn’t where I need to it to be, in order for it to be visible behind my subject.
So, I fake it. Here are a few examples.
This was shot at approximately 1pm. The sun was obscured by tree canopy and we faked the setting sun with OCF.
This one is a little more subtle, just a very slight lightwash, from just out of frame.
Fake setting sun (the sun had already dipped below the ridge line and some low clouds). Note the placement at the edge of the frame and just above the distance hills.
This set up also included a reflector to bring some light back onto Blanca's face.
This set up is a little more in your face in a sense. This is designed to look like the sun coming through a gap in the tree coverage. The actual sun was higher up in the sky in roughly the same area.
You can achieve this look with a single speed light, a half or full CTO gel (gelled to taste), and a little know-how.
Step One: Understanding
The key thing to remember here is that the strobe is not your main light. This lighting method is the very essence of blending off camera flash with ambient light. In all except for one of the above examples, the ambient light is the main light and the “sun” light is kept relatively low output to blend in with the ambient exposure. Like the secret to a good haircut or a killer smoothie, its all in the blending.
Step Two: Expose Properly
Get your ambient exposure at or a little above where you want it. If you’re working on a close in portrait (chest, head, and shoulders) you can bounce light off a reflector and back into your subjects face. Overexposing the ambient light slightly will go a long way in making your strobe blend with the daylight.
This was the ambient for this shot. You will see we need to expose OVER this to help the strobe blend with the natural light.
This is a great example of the ambient light being too low and making your cone of fake sunlight obvious. Blend Blend Blend!
Step Three: Place and set your light
Get your CTO gelled flash in frame or JUST out of frame and set power output to your desired effect. play around with the blending of it until it looks natural.
We finally hit the goldilocks ratio of ambient and strobe. The result is a totally convincing setting sun.
Step Four: Realize this doesn’t always work
This is a little hard to explain, but there are a few situations where this just wont work. It will look fake and contrived. The most common situation is where there are a lot of objects between your flash and your subject. The cone of light is not sufficient to fake sunlight on all objects in the frame. You want to make sure that any objects aside from your subject are being hit by this fake sunlight also, otherwise it will just look really fake. Observe the image above, where our cone of light is obvious. It is a combination of underexposure of the ambient light, and the viewer seeing too many background elements that SHOULD be affected by the "sun" light, but aren't.
Step Five: Remove light stands in post (if necessary)
Whenever possible I hide light stands or use a LumoPro studio clamp to reduce the amount of post processing I have to deal with. In general however, it's not terribly difficult to remove a light stand in Photoshop.